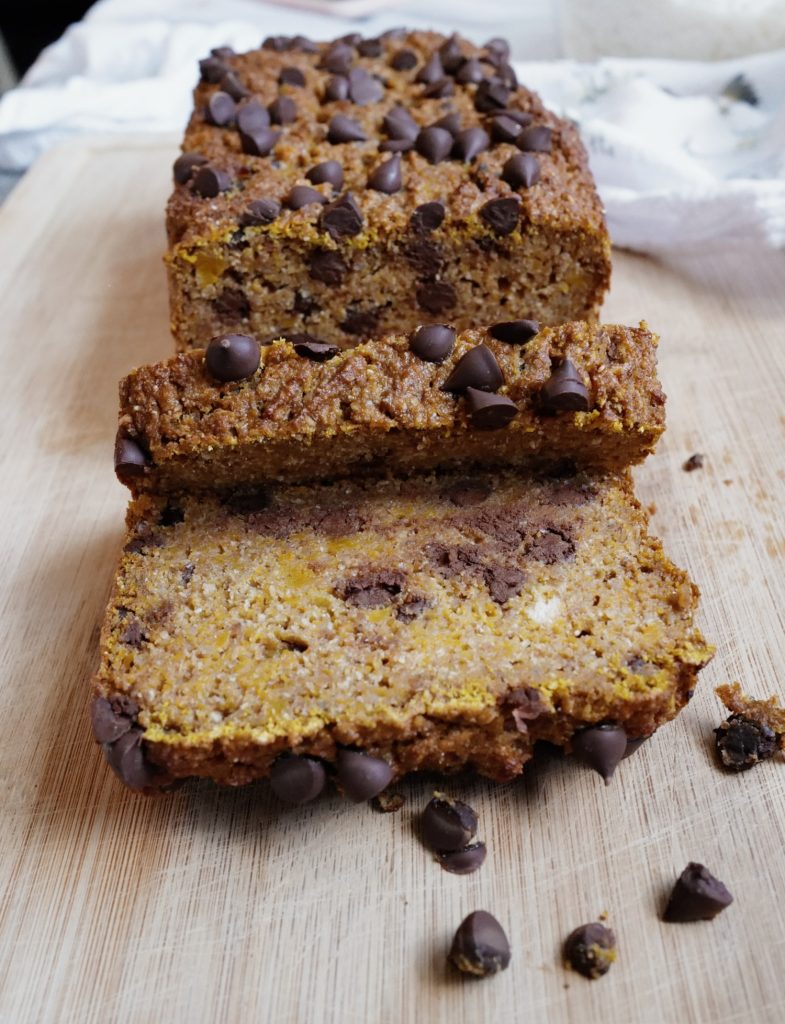
With the fall season in full swing, I’ve been seeing lots of squash and pumpkins at my farmer’s market. Because I love buying in-season produce, I recently picked up a butternut squash. At the time, I had no idea what I was going to do with it, but quickly decided that it was going to be used for a super healthy butternut squash bread that’s, wait for it…
Fermented!
Although this butternut squash bread recipe is specifically for a butternut squash, I’ve also tried it with kabocha squash. And, if you have pumpkin, I know that this fermented bread recipe will work just as nicely too!
This healthy butternut squash bread is a take on my oh-so-popular Healthy AF Banana Bread (that I make all the time on Instagram Stories), which is gluten-free, dairy-free, refined sugar-free, and nut-free.
Hmmm, so what should I call this bread? I need something catchy…
How To Make Moist, Yet Firm Fermented Bread
But there are definitely some small differences that make a huge impact for my moist, yet firm butternut squash bread. When I first tried making this fermented bread, it was way too wet…almost soggy. Didn’t want to keep its shape. So, I messed around a bit until I finally got a well-structured, stiff bread that was deliciously moist. But not overly moist.
As you may know, I make a lot of homemade coconut milk because I like to use it in my morning matcha lattés. I save my coconut pulp (leftover from making the milk) and dehydrate it in my dehydrator. You can also dry it out in the oven at the lowest temperature.
So, I’ve been saving up a ton of coconut flour (yes, this dehydrated coconut pulp is known as coconut flour) in my pantry with not very much use for it…although, I knew it would come in good stead soon enough.
That soon enough has arrived. What better than to add this pure, unadulterated coconut flour to my healthy butternut squash bread recipe?! This totally helped with my soggy bread problem and even added to the structure of the bread.
I also purchased some organic pumpkin spice, which I thought would be a nice change from plain old cinnamon. Nothing screams fall season like pumpkin spice!
Why Do You Ferment Grains?
Without going into too much detail about why I ferment my grains, I do want to touch upon it. There are many health benefits to fermenting grains before cooking them.
- Fermented grains don’t spike blood sugar
- Grains that have been fermented have more magnesium, zinc, iron, and B12
- Phytic Acid and enzyme inhibitors are neutralized due to the fermentation process
- Fermentation reduces the total amount of sugar because the friendly bacteria eat the sugar in the batter
- Fermenting grains breaks down the gluten
- Flavor profile of fermented grains is greatly enhanced
As you can see, there are many reasons why fermenting grains is very nutritious and beneficial for your health. Eating a fermented bread is so much easier to digest! In fact, those with gluten intolerance may even be able to tolerate a fermented bread quite well. Additionally, I firmly believe it’s better for your waistline.
Nevertheless, I choose my grains very carefully. I only work with heritage, ancient grains as they haven’t been hybridized like the wheat we find in everyday products and on grocery shelves. The gluten in hybridized wheat is a different type of gluten than the gluten found in ancient grains and affects the body negatively.
What If You Don’t Have All The Ingredients? Will Recipe Still Work?
I’m a believer in winging recipes. I rarely measure ingredients, because I sort of know how to eye ball the measurements. That being said, the consistency may change slightly if you don’t use the recommended ingredients and quantities as listed below.
But, to give you an idea, I don’t measure the amount of squash I use. I figure about 2 cups, take or give. You can use the extra squash you have leftover for making a butternut squash soup or baking with a roast. Or, you could just bake the butternut squash pieces in the oven with salt, pepper and olive oil. That’s so good.
Raw whey gives a fabulously fermented batter and works best. But, you can substitute with lemon juice or ACV just as well and they will give you a nice result too.
You don’t have to grind your grains fresh, but it makes a huge difference. Flavor and freshness. Nothing like using fresh! The problem with store-bought flours is that they may have been sitting on the shelf for a long time and can easily go rancid because of oxidation.
I always strive to use the highest quality ingredients. Organic everything. I don’t like pesticides and toxic chemicals in my food, u know what I mean? Click here for a shopping list of all the ingredients you need for this healthy recipe.
Why Is My Batter Not Fermenting?
Fermentation can be a tricky thing. Environmental temperatures will change ferment times drastically. If it’s hotter, ferments will happen much quicker vs. if it’s cold, ferments may be slower.
I wish I could say, “do this and do that” but I can’t…I can only guide you. You will have to figure it out on your own. The more you play around with ferments, the more you will understand what’s going on. You will know where something is at in the fermentation process based on how it looks and smells.
For this healthy butternut squash bread, my ferment takes longer than when I ferment buckwheat alone, which I do for my Healthy AF Banana Bread. A 24-hour ferment time may be enough, but it may need to go longer…say, closer to 36 hours.
You know that fermentation has taken place when there are lots of bubbles in the batter (which you can easily see if you ferment batter in a glass bowl). Using a combination of buckwheat and spelt for this butternut squash bread, at 24 hours my batter had very few bubbles and wasn’t as puffy on top as I wanted it to be. For this reason, I let it go longer and just kept checking it every few hours. By about 30 hours, there were many more bubbles in the batter.
When fermenting grains, you’ll need to use your eyes and trust the process.
Now, don’t let it ferment too long. The longer you ferment, the stinkier it will get and at some point it will be no good. So, my advice is to pay attention and enjoy the process.
Once your batter is fully fermented, give it a stir and enjoy the crackling sound. You’ve seen me do this many times on Instagram. I just love it!I The crackling and bubbling gets me every time 🙂
Now – the moment you’ve been waiting for…let’s get to this fabulous, fall-season inspired recipe!
HEALTHY BUTTERNUT SQUASH RECIPE (Fermented)
I posted all of the following non-perishable ingredients in my Amazon Store so you can easily buy them in 1-click. I’d love to see you make this healthy bread this fall season. When you do, please tag @nubry on Instagram so I can see your work of art.
Ingredients
- 1/2 Butternut Squash – skinny side (peeled, deseeded, and chopped into about 1″ chunks)
- 1/2 c Organic Whole Spelt Berries
- 1/2 c Organic Raw Buckwheat Groats
- 1 c filtered water (warm)
- 1 TBSP raw whey (I save the whey when I strain homemade yogurt to make it thicker) or use raw ACV or lemon juice
- 1 Pasture Raised Egg
- 1/2 c coconut flour (I use the dehydrated pulp from my homemade coconut milk)
- 1 tsp Organic Pumpkin Spice
- 1 tsp Organic Vanilla Extract
- 3 Tbsp Maple Syrup
- 1 tsp Baking Soda
- 1/4 tsp Fine Salt
- Dark Chocolate Chips (Optional)
Directions
- Blend buckwheat groats and spelt berries in Nutribullet or blender until flour consistency.
- Stir fresh flour with warm water and raw whey (or ACV/Lemon) in a small bowl and let sit in a warm spot for approximately 24-36 hours. There will be bubbles in the batter and may look puffy on top when it’s done. There will likely be a pleasantly sour smell.
- When you’re ready to bake the bread turn oven to 350F.
- Steam butternut squash for 10-15 minutes until fork can be inserted and taken out with ease. Let cool a few minutes and then mash in a large bowl.
- In the same bowl, combine the rest of ingredients – whisked egg, fermented batter, coconut flour, pumpkin spice, vanilla extract, maple syrup, baking soda, and salt. Lightly stir until mixed.
- If adding chocolate chips, lightly work desired amount into batter. Reserve a handful to decorate the top of bread.
- Pour batter into parchment-lined bread pan.
- Bake at 350F for approx 65 minutes. Fork inserted should come out clean (except for melted chocolate).
- Remove from oven and let it cool. Do not remove from the parchment paper until its cool as it may stick.
Serving and Storage Suggestions
- Swipe with grass-fed butter and enjoy! Try to control yourself as this loaf will fly! Either way, there’s no guilt. This is the healthiest bread ever.
- Keep bread in parchment paper and store in the fridge. Enjoy bread cold or you can leave it on the counter and let it come back to room temp before enjoying.
Leave a Reply